Customer rating!

Installing underfloor heating yourself
Installing underfloor heating yourself: it’s that simple!
Looking at traditional systems or systems that require milling, underfloor heating installation might seem like a daunting task. Thick concrete layers, the use of machines… But what if it could be much easier? With WARP Systems, you can do it yourself! Whether you’re an experienced professional or a DIYer.
Our water-based systems are specifically designed to make installation accessible for everyone. That makes it easy to create a comfortable, warm or cool home. Because when you combine WARP Systems underfloor heating with a heat pump, it can do more than heat: it can also keep your home cool during summer.
-
No specialist knowledge required
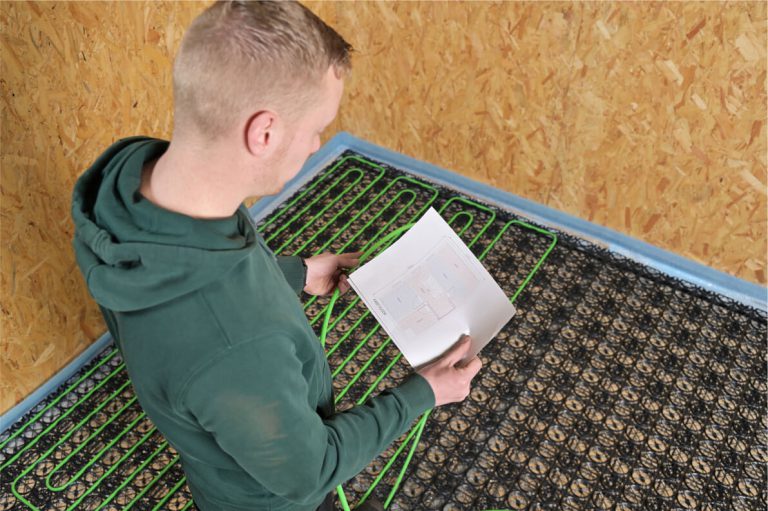
Thanks to clear layout plans, installation videos, and manuals, you’ve got everything you need.
-
Underfloor heating delivered even faster
Receive everything you need within 3 working days. Install whenever it suits you.
-
Stay within budget
Save by installing underfloor heating yourself.
-
Everything you need delivered at once
With WARP Systems’ complete sets, you get everything you need in one delivery.
Why is installing WARP Systems so easy?
Click-break-slide system
WARP Systems always fits. The SpeeTile system features a click-break-slide system: click the mats together, break them by hand if they’re too long, or stretch them slightly when you need more length. SpeeTherm panels are also easy to cut to size for a perfect fit.
No chiseling, breaking or milling
WARP Systems is a build-up system with minimal installation height. Simply place it over your existing floor. No milling needed and your original subfloor can remain. That means no dust, debris or time-consuming prep.
All the help you need
A clear manual, video instructions, a free layout plan and support with applying levelling mortar at WARP Systems. Plus, our experts are available on weekdays to answer questions. That makes installing underfloor heating yourself incredibly easy. Check your layout plan to find out what goes where or contact us if you get stuck. We’re happy to help!
Step-by-step plan: installing underfloor heating yourself
To give you an idea of how the installation works, we’ve outlined the key steps for you (you’ll receive a detailed manual with the system).
Installing wet construction system

Step 1: Clear and clean the room
Remove all objects and make sure the space is clean.

Step 2: Apply reflective foil on the wooden subfloor or primer the concrete subfloor
This, together with the next step, ensures the levelling mortar is applied evenly throughout the space.

Step 3: Place edge insulation around the room
For a clean and professional finish.

Step 4: Lay SpeeTile mats
Thanks to our clever click-break-slide system, you simply click the mats together, break them off by hand if they’re too long, or slide them apart slightly if you need extra length.
")
Step 5: Secure the mats with screws on wood and adhesive for concrete
The mats have clearly marked fastening points, so you know exactly where to drill or glue.
Step 6: Lay the heating pipes using the layout plan
Refer to your custom layout plan, which clearly shows where and how to lay the heating pipes. Simply click the heating pipes into the tracks that are already integrated into the mats.

Step 7: Install the manifold and connectors
Cut the pipes to length and make them suitable for connection to the manifold using our handy CalibrationTool.

Step 8: Mix the levelling mortar
For large areas (20m²+), use WARP Systems’ support with applying levelling mortar.

Step 9: Apply the levelling mortar
Use the spiked roller to roll over the levelling mortar. This removes aby air bubbles and helps ensure the levelling mortar dries smoothly.

Step 10: Let the levelling mortar dry
After 4 hours, the floor is walkable.

Step 11: Connect the system to your central heating boiler or heat pump
Only after making this connection can you start supplying warm water to the system.

Step 12: Execute the commisioning protocol
Depending on the room temperature, wait 48 to 72 hours before starting this step. Over the course of 7 days, follow the commissioning protocol included with your system. This helps prevent cracks from forming later.

Step 13: Place your floor finish
Once the protocol is complete, install your chosen top floor and enjoy your system!
Installing dry construction system

Step 1: Clear and clean the room
Remove all items from the space and ensure there is no dust or debris.

Step 2: Place the EPS panels per group throughout the space
To avoid damaging the panels, we advise you to work per SpeeTube group. This way you can complete one section before moving on the next, without having to walk on the EPS panels. If the panels are too large for the remaining space, simply cut them to size with a utility knife.

Step 3: Place AluTherm heat distribution plates
Press them into the previously placed EPS panels according to the layout plan. Again, work group by group to complete one section at a time. Press into the EPS according to your layout plan.

Step 4: Lay the SpeeTube heating pipes
Lay the heating pipes into the AluTherm profiles according to the layout plan. If any bends are missing to follow the exact layout, you can use the optionally included torch to create additional bends.
Step 5: Install the manifold and connectors
Cut the pipes to length and make them suitable for connection to the manifold using our handy CalibrationTool.

Step 6: Install your floor finish
Place your final top floor directly on the system.
Step 7: Connect the system to your central heating boiler or heat pump
Only after making this connection can you start supplying warm water to the system. The system is ready to use!
What you need for DIY installation
Get started quickly with complete DIY packages that provide everything you need in one go.
To make things easier, we’ve put together complete DIY packages for each system. Inside, you’ll find all the components required for your setup. That way, you’re certain you have everything needed for your project. The added benefit: you’ll know the total investment upfront, no extra added costs. Already have some parts at home? Just leave those out and order only what you still need. Choose the system that fits your home and get started!
Wet construction package

When to choose SpeeTile?
- Slim system with 1.5cm installation height.
- Suitable for concrete and stable wooden subfloors.
- Compatible with floating, glued and poured finishes (e.g. PVC and cast floors.)
- Suitable for underfloor, wall and ceiling heating.
- Water-based system, ideal as main heating.
- Also cools your home in combination with a heat pump.
Dry construction package

When to choose SpeeTherm?
- Compatible with floating, rigid floor finishes like laminate and parquet.
- Suitable for concrete and (unstable) wooden subfloors.
- Suitable for underfloor heating.
- Water-based system, ideal as main heating.
- Can also be used for cooling your home in combination with a heat pump.
Request a quotation for a DIY package
Curious about the options and costs for your project? Or ready to get started right away? Request a quotation. We’ll get back to you within one working day. If you move forward with the order, you’ll receive your WARP Systems solution within 3 working days. You can now install underfloor heating in your home right away.
